Connect Billomat with Shopify and link your online shop and your accounting.
The interface to Shopify can process incoming orders in your online shop automatically or manually in Billomat.
Here you will find step-by-step instructions on how to set up the interface. You can also jump directly to the individual points:
Important: Configure your gross prices in advance in your Billomat account under Settings > Configuration > Taxes so that the Shopify app can function smoothly.
3) Connect Billomat to Shopify
Degree of automation for your invoicing
This is how it continues in Billomat after the order has been placed
Further questions about the Shopify interface
1) Install the Shopify app
To be able to connect Billomat to Shopify, you of course have to download the Shopify app first. You can find it in the Shopify App Store at this link. You can now find the Billomat app under the menu item Apps .
2) Choose your tariff
In the Shopify interface you will now see a choice of two tariffs. Choose the Connector tariff if you already have a Billomat account and the Connector Pro tariff if you do not yet have a Billomat account.
Why is the Connector Pro tariff more expensive than the Connector tariff?
To use the Billomat app for Shopify, you need an account with the Billomat accounting software. The simple connector tariff for $ 5 is aimed at users who already use Billomat and thus pay an additional € 19 per month for their Billomat account.
With the Connector Pro tariff, we offer new users who have never used Billomat the convenient option of paying their Billomat account directly with the usage fees for the Billomat app. The 19 € for the Billomat account and the 5 $ for the Billomat app result in a total fee of 24 $ for the Connector Pro tariff.
After you have chosen the tariff that suits you, you can connect the Shopify app to Billomat. Please note: If you have chosen the Connector Pro tariff, you must first register with Billomat. Follow the instructions in the Shopify interface to do this.
3) Connect Billomat to Shopify
Now you can define the settings for the connection between Shopify and Billomat. To do this, first enter your BillomatID and then your API key. Then click on Connect or, in the English version, on Connect.
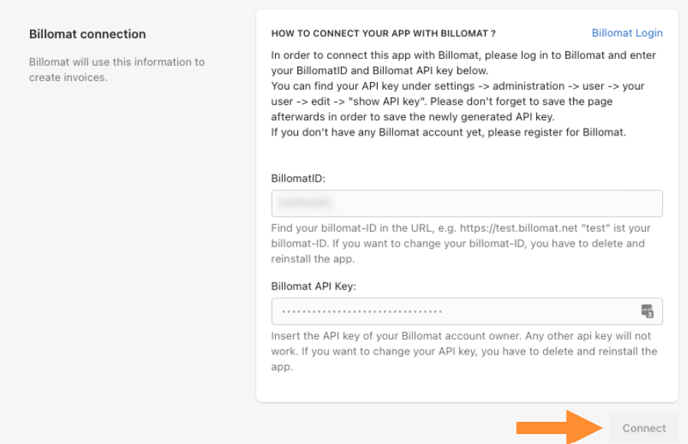
Note: To connect your Billomat account to Shopify, you need an active API key, which you can find in the settings. If your API key is not accepted, you should check whether you have saved the newly generated API key beforehand. If this is not the case, you can simply generate a new API key, save it and then save it in the settings of the Billomat app.
4) Further settings
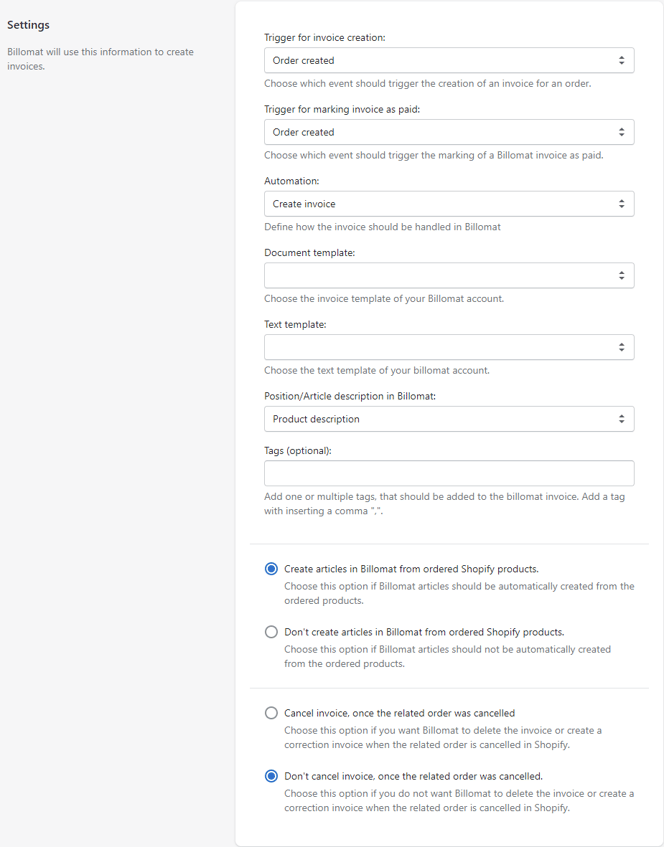
After you have successfully connected Billomat to Shopify, you can define other important settings for the interface.
For example, you can specify when an invoice should be created. In our example, Order created was specified as the trigger - the document is generated as soon as an order is created in the shop.
You can also specify here that articles for your orders are created in Billomat or that your invoice is taken into account accordingly in the event of a canceled order, or a correction invoice is created .
Degree of automation for your invoicing
The Billomat app offers you different levels of automation.
- "Create invoice": If you select this level of automation, your invoice will only be created and then remain in the draft status. This means that you can continue to process this invoice in Billomat. Please note, however, that it is not yet possible to download the invoice in this status.
- "Create and close invoice": If you choose this level, your invoice will not only be created in Billomat, but also closed. This means that you can no longer make any changes to your invoice.
- "Create, complete and send invoices": Your invoicing is automated to the greatest extent with this level. If you choose this option, your bill will not only create and complete, but also in addition to the specified your customers e-mail address sent.
Select templates
If you have already created document templates in Billomat, you can select them here. If you have not yet created any templates, you have two options in Billomat:
- You can partially individualize your invoices with our template editor: With this you can freely define the font, font size and font color and also integrate your own logo or a background image in the invoice template. You can find out more about this here.
- If you want to customize your invoice even more, you can also use a standard word processing program such as Microsoft Word or OpenOffice to create your own template. Here you will find instructions with Microsoft Word and here the instructions for creating templates with Open Office.
Note: The Billomat app does not currently offer the option of automatically using different document templates depending on the invoice recipient. However, it is possible to manually store different document templates in Billomat. For this we recommend to select the level of automation "Create invoice" so that your invoices are only created but not yet finalized. Now you can edit your respective invoice in Billomat and choose the document template there individually.
Add tags
The setting of keywords is optional - you do not have to enter any keywords. However, keywords can help you later, for example when assigning invoices to your Shopify shop. The keywords stored in the Billomat app are added to your bill in Billomat so that you can, for example, filter all your bills according to these keywords. Of course, your customers will not see the keywords stored on your invoice.
Save - done!
This is how it continues in Billomat
The interface now presents your settings accordingly (see section 4) the corresponding invoice with the corresponding customer or articles under the heading invoices and master data > Artik el / K and ends in your Billomat account.
Why is VAT added again to the items on my invoice?
By default, Billomat uses a net price basis for invoicing. This means that the set tax rate will be applied to all invoice items. If you want the gross prices stored in Shopify to also be used in your Billomat invoice, you can configure a gross price basis.
To do this, navigate to Settings > Configuration > Taxes and click on the Configure gross prices button. Now you can set a gross price for all of your articles. Simply set this to the value of the net price. The latter is recalculated after the changes have been saved. From now on, the correct price should be shown in newly created invoices.
Further questions about the Shopify interface
Will the payment method for my order be sent to Billomat?
The payment method for orders is currently not transmitted to Billomat. "Other" is therefore stored in Billomat as the payment method. We plan to implement this function in a timely manner so that this is also possible.
I am missing a function. Whom can I contact?
We are constantly developing our app and are therefore grateful for any feedback. So feel free to contact us if you miss a function so that we can plan its implementation in a timely manner.