With the WooCommerce plugin, Billomat automatically generates an invoice for the incoming order in your online shop.
Would you like to connect your Billomat account to your WooCommerce shop? Billomat offers you a comprehensive interface to your WooCommerce shop, with which invoices are automatically created in Billomat for your orders.
How do I connect Billomat to WooCommerce?
1) Download the Billomat WooCommerce plugin
To connect Billomat to your online shop, you need our Billomat WooCommerce plugin. You can download the plugin here for free:
2) Install the Billomat WooCommerce plugin
Move the installation file to the "/wp-content/plugins/woocommerce-billomat" directory or install it via the WordPress Plugin Management.
Then activate the Billomat plugin via the plugin page.
3) Link your shop to Billomat
If you have successfully installed the plugin, you must link your WooCommerce shop to your Billomat account.
- Via WooCommerce > Settings > Billomat you reach the input mask. Enter the BillomatID of your account here and store your API key. Then click on Save changes to establish the connection between Billomat and WooCommerce.
4) Set up webhooks
The plugin uses webhooks for the two-way synchronization of customer and item data as well as for the automatic creation of invoices and delivery notes via Billomat.
You must set up these webhooks in your Billomat account.
To learn more about our webhooks, you can read our WooCommerce Manual.
To the manual (german only)
How does Billomat WooCommerce work?
As soon as you have successfully linked Billomat and WooCommerce, the plugin starts its work and automates the invoicing analogous to the incoming orders.
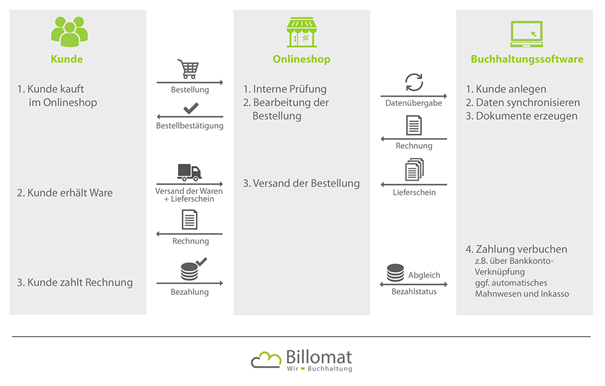
- Order in the online shop:
The plugin creates a new customer based on the orderer data. The data is synchronized on both sides. For example, if you make changes to the customer data in your Billomat account, the orderer data in WooCommerce will be adjusted accordingly. - Invoicing:
Billomat automatically creates a PDF invoice based on the incoming order in your online shop. You can use the plugin setting to define exactly when the billing should take place for each payment method. You can call up the invoice both in your WooCommerce customer data and in your invoice overview in Billomat. - E-mail to customer:
The invoice is (depending on the configuration) sent directly to the customer, either as an attachment to your confirmation e-mail or as a separate e-mail from your Billomat account. - Dispatch of the order:
In addition, the plugin also creates a delivery note for you, which you can enclose with the goods. You can call up the delivery note in a WooCommerce customer data.