Are you currently using the Billomat banking interface and would you like to continue using it? Then here are the instructions on what to do next.
Contents
1. Establish the connection to the bank
3. Enter and confirm banking access data
I. Most important Information
The current banking interface will be deactivated on August 31, 2023. To use the new banking interface, follow the instructions under point II. What needs to be done?.
Of course, all your previous transactions will be transferred to the new banking. You can find out the exact time of the data migration in your account in our update mailing
Important:
- During the migration, your complete transaction history, i.e. from the start of setting up your Billomat banking to the day of the last synchronization, will be migrated to the new banking module.
- In order to ensure a complete history, we recommend synchronizing your bank data in the old banking at least once before the migration.
- During the initial synchronization of transactions in the new banking module, transactions are loaded from the day of the last synchronization to the day of reconnection.
- We recommend connecting your accounts in the new banking module on the migration day.
- An algorithm compares the data in the new banking with the previous data from the old banking. Nevertheless, the tip: especially at the beginning you should pay attention to "double sales" . You can either mark such transactions as "completed" or hide them in the new banking .
II. What needs to be done?
1. Establish the connection to the bank
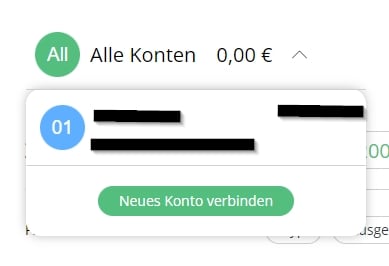
Navigate to "Banking" in the left menu bar, select the desired account from the "All accounts" drop-down menu on the left and then click on "Connect new account" to establish the connection.
2. Select account.
In the next window, enter the bank details of the account: To do this, select the bank you are using from the corresponding drop-down menu or enter the IBAN , the bank code or the name of the bank directly in the field.
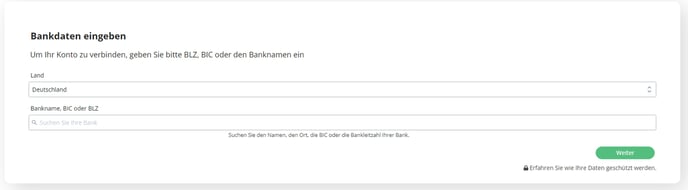
Note: If you are using multiple accounts, our recommendation is to connect each account individually.
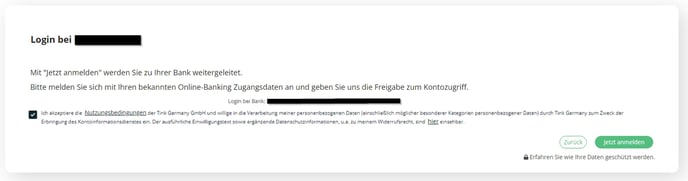
3. Enter and confirm banking access data
As soon as you have made a selection and confirmed it, you can enter the access data for your bank account in the next step.
After you have accepted our partner's user agreement and clicked on "Next" , you will now be asked to grant access to your bank account via Billomat.
Depending on the bank used, the following step may vary. For example, you could be forwarded directly to your bank or you will receive a request to authorize access via a mobile app from your bank (e.g. via TAN procedure).

4. Final Steps
If the authorization of your access data was successful, you will be forwarded to the list of your transactions and, as mentioned above, the most recent transactions will be loaded into Billomat. Depending on the number of transactions, this process can take a few minutes.
As soon as the process is complete, you can assign the sales to your invoices or process your payments.
III. General information
Which banks can I connect to Billomat?
Billomat Banking supports almost all banks in Germany and Austria. Numerous banks from abroad are also in our network. Feel free to contact us, we will then check whether your bank is supported by the interface.
How does the automatic assignment of transactions to invoices work in the new banking module?
There is currently no automated assignment of transactions to invoices in the new banking module. This function is being fundamentally revised and modernized so that the automatic posting can be processed even more intelligently in the future.